Goooodly Morning Stampers and a very happy
sunny Sunday to you
all! Thank you for your fabby lurve entries into last weeks challenge. The song title for the theme this week has been chosen by my BFF Ellen... and it is CHRISTMAS.
You can interpret the challenge how you like: which isn't that difficult this week as Christmas is such a big old theme :O)) To
join in with the challenge is simples: make a little something, it can be anything you fancy. Add in the theme AND
some stamping *this is THE important bit guys, please remember your rubberstamps!* and then hop back here, leave me a comment with a link to
the place you are showing your entry and I can come see you. If you
haven't got a blog, you can join in via Facebook (just tag me name) or
by emailing a small res.pic to me. The challenge will remain open until 21:00 Saturday 6th December 2014.

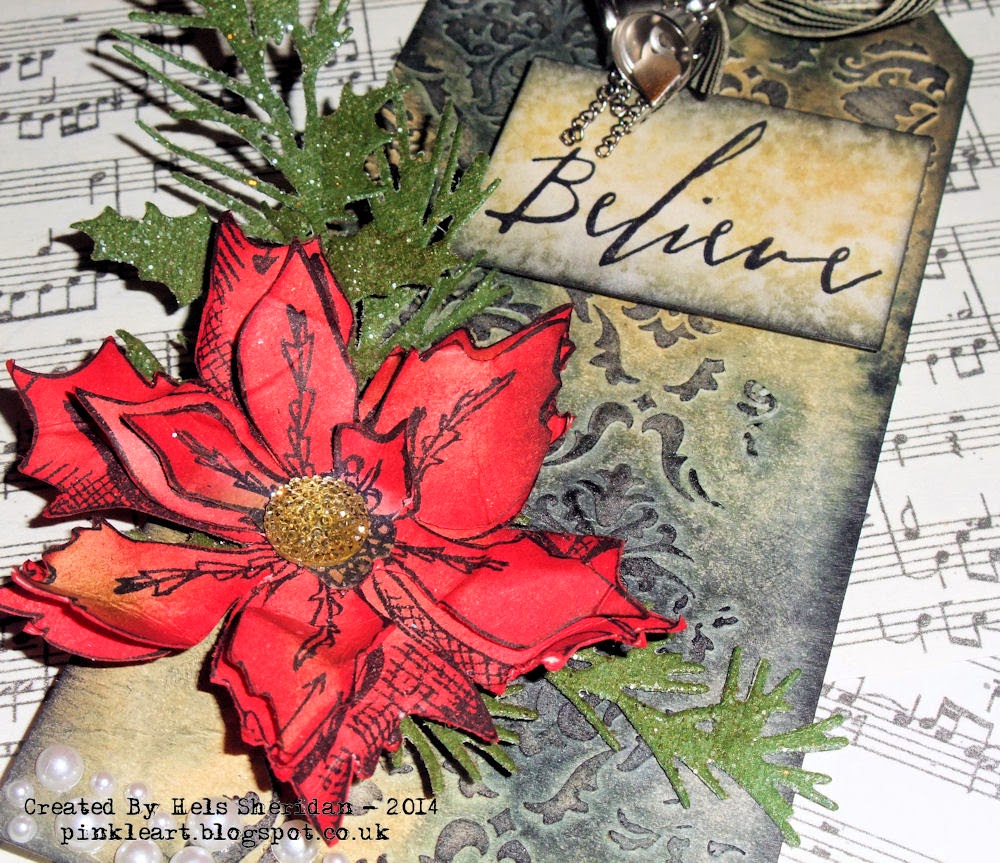
My entry this week has come about because of a fabby Skypey sesh I had with Ellen yesterday. As usual, we had an I Challenge Thee... basically, we put together a recipe and get crackalacking making stuff. Only this week we are both barren of Mojo so Ellen grabbed her Ranger U tags... and I grabbed mine... and we chose the Nostalgic Batik technique. Now this is a technique I haven't used for several hundred years and it was so lovely to revisit it. And... I decided I would do a little step by step to show you how to do it too :O)

But first.... the recipe!
Technique - Nostalgic Batik
Base - Manila Tag - any size
Theme - Christmas
Must Include: Tinsel/Festive Garlandry, Bow, Bells
Stamps of own choice
*this is the killer* NO PAPER FLOWERS OF ANY DESCRIPTION! *Ellen chose that... the vixen lol*
Please do feel free to use our recipe... and we'd love to see what you come up with too :O))
Here's the technique:
STEP 1 & 2
Using a couple of colours of Distress Ink, ink and stamp your image. Immediately cover with clear embossing powder, heat until shiny.

STEP 3
Use a co-ordinating colour of Distress Ink (and let's face it, they all co-ordinate) and blend ink right over the entire piece. As usual, I added some Frayed Burlap around the edges... I always do that, I do!


STEP 4
Use a hot iron (for those of you who aren't sure what this is, it is a little metal electric jobby that gets red hot, perfect for getting creases out of clothes *snort* but also perfect for crafty stuff too!) with a piece of absorbent paper over the top of the stamped card, press firmly and hold the iron in place, the heat from the iron will re-melt the embossing powder which will soak up into the paper and remove said embossing powder giving a lovely nostalgic look to the art. If you find that the paper is stuck to the card, simply rub the iron over the top again and it will lift off whilst still hot.

It is worth noting at this point that I GOOFED up... big styleee.... but actually, I liked my goof up so I kept it. What did I do? Well, I was so chuffed with the fact that I managed to stamp and emboss and it looked great that I skipped the Step 3 and went and ironed off the embossing powder before I had coloured over the card. Ooops. Well, I decided that seeing as there is always a residual amount of embossing stuff left on the stamped image, I would see if inking over the top actually would kill the whole thing or if the residual stuff would be enough of a resist. And it didn't kill it completely... but what it did do was create a little bit of a halo.. which I likes! Happy accident right? To finish the tag, I added my bow, made with crinkle ribbon and Pine Needles DI, some Idea-ology (and how chuffed was I when I found the Christmas Word Band with the right song title words on it!) The ickle rusty bells attached to Pine Twine around the Prancing Reindeers neck checked the bells and garlandry off the recipe and of course, no paper flowers so... I used real pine cones instead! Teeehee!

And there you have it! Please do go and check out what Ellen has been up to HERE... she was making mini tags the last time I saw... and she was up to about 87! As ever, thanks for looking... have a grand day! TTFN
Hels x