Friday 30 May 2014

Ballerinas...

...little pretty "ballerinas" are one of my most vivid memories of summer as a kid.  And seeing them still in bud form and reaching out and "popping" them.  What am I waffling on about?  Fuchsias of course :O)  Of all the plants in the garden, fuchsias are my favourite.  I have slowly been adding them to my collection, now I have a greenhouse I can make sure they don't cark it over winter too.  So, imagine my thrill of happiness when I spotted the new Paradise Collection from Craftwork Cards when I was over at Crafty Bunch last weekend.


Not only are there fuchsias on the papers, there be hibiscus, bird of paradise, butterflies and... hummingbirds!    I remember a holiday to St Lucia when I decided to go all David Bailey and get some really cool "shots" of hummingbirds that used to hover around the pool area all day.  It was back in the days of using 371 films in your camera, taking said films to Snappy Snaps the moment the plane landed back in Blighty and waiting, very impatiently, for the one hour developing service... grabbing said photo's (yes, I took 10 rolls of 36 exposures, imagine how much that costed me to develop!!!)  quickly flicking through the photo's to see the amazing things I had photographed whilst on my travels.  Ahem.  Yes, well, enough about that.  My hummingbird shots, all 192 of them were nothing but a very small and very strange looking blob in the middle of a photo of the pool!   Ok so maybe it was the camera's fault for being old or maybe just the idiot operating it.  Anyways, the point of all this info is that I needed to tell you about Linda Ledbetter.  Now, Linda is not only is a fabulous artist and all round gorgeous gal, she also takes awesome photo's.. CLICK HERE to see them. Linda took a load of pics of hummingbirds last year... I was so happy to see the photo's, hummingbirds just make me smile... and now when I sees one, I think of Linda.


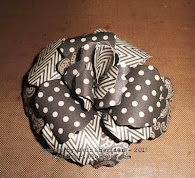
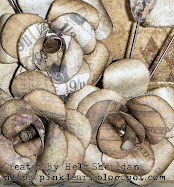
What to do with the papers huh?   I freely admit that I have a very lot of the CWC collections... and a very lot of them are sitting, un-cut, in a box, mainly because I haven't had time to have a proper play yet and a smidge because they are sooo gorgeous!  Anyways, I got this new paper collection and last night I was on "free crafting time"  ie: any time in the middle of the night is free crafting time, FCT,  meaning you can do whatever you likes and it is not eating into prep time for work kind of stuff.  So, armed with a couple of hours of FCT and the paper collection, I got a little inky with a tag.  There are some foiled papers in the collection  and this isn't normally a style I likes, these, however, are perfect.  I covered the tag with papers, inked around the edges with Seedless Preserves DI and then scruffed the edges and went around with Vintage Photo.  The rose is made from the diecuts in the collection, again inked with Seedless Preserves.  The ickle sentiment is from the kit and I added some jute to make it a bit more natural looking.  Hessian for the flower, string for the top and voila, done!  I am so loving these papers!!!


My only problem now is that I want to make more stuff with the papers and I can't because I am now waist deep in sample making for Tuesday's tellybox shows... tis all goodly fun though and you never know, I might well get some more FCT tonight, sleeps seems to be evading me at the moment!   Oooh and I nearly forgot to tell you... tomorrow, Saturday 31st May 14, sees the opening of a brand new craft shop and tearoom in Devizes - called Cups & Crafts, located on Northgate Street, Devizes and I will be there doing a full demo day, playing with all things inky, papery and stampy - so if you are in the area, please do pop by to see us!     Have a grand day all!  Thanks for looking... TTFN

Hels x

Thursday 29 May 2014

A Recipe For Inkyness!

...yesterday I was a-mooching around yonder Facebook, you know, as you do for several hours and I happened across a post by my mate Lou who was saying she needed a challenge cos she was sitting around doing nowt.  Well, never one to pass up the opportunity to get peeps all inky, I gave her a list of stuff to use, recipe like, and said Go!   And then I thought to myself that actually, I could do with a bit of a challenge too, so I grabbed my inks and got playing.  Here's the list of stuff in the recipe: A tag, Distress Ink using Broken China, Spiced Marmalade, Pine Needles, use three different stamps, use die cuts and some ribbon.


 Out came the DI's to start with... what on earth was I thinking!!!  Pine Needles!!! Pine Needles usually has me running for the hills as it is a lovely colour but it is just that... colour!!!  A deep pine blue/green (you guessed that already from the name tho right?)  And orange too!  How did I come up with the ink colours?  I just typed the first three that came into my head.   I started off by blending the three inks over a tag base, making sure it was thoroughly inked and then I spritzed a Tim flourish stamp with water and pressed this onto the tag to get a bleached stamping effect.  It helps if the ink is a "thick" layer and always keep the stamp in place for about 30 seconds, this makes sure the water eats through the ink.  A quick zap with a heat tool to dry it and then onto the next bit of stamping: namely the script (my fave script from Letters To Santa by Tim) using Pine Needles to stamp over the tag.  I then re-inked the flourish with Watering Can Archival (ok, smidge of a cheat here but it is like bunging a handful of glace cherrries into a cake mix... isn't it?)  


On to the sentiment, which is the third stamp.  I have had the new Tim stamp phrases for a few weeks now and not had a chance to play properly and this one in particular has been whispering at me to use it.  Isn't it just lovely!  And, I kept singing the words, over and over, annoyingly not knowing why I was singing them.  Then it dawned on me!  Elton John!  So I sang the rest of the song, you know, just because I could and a little sing song always lifts my spirits.  Not sure the neighbours would agree but hey, they can always close their windows...   The card was inked slightly differently for the sentiment - I didn't want it as dark as the background tag.  I squidged the ink pads onto my craft sheet and lightly misted with water, dipping and dragging the card through the inkyness, drying and then lightly blending over the top with more inks, not re-inking the blending foam so I didn't over do it.  The sentiment is stamped in Jet Black Archival (ok, another cheat but you needs a black ink for a sentiment I always thinks)  The flowers are Kaisercraft Sea Spray blooms, inked with a smidge of Pine Needles and the leaves were left over from my CC3C tag the other day, I just gave them a bit of dimension by bending the leaves a bit.  Finishing touches were the Linen Ribbon (ohlalalaaa... seriously my FAVE new ribbon! You can pull at it and distress it and make it look yonks old!) and a few bits of Idea-ology.


Anyways, I was thinking, *don't worry, I was sitting down* if you too are a little bored and Mr Mojo has gone off in a huff, feel free to lift the recipe and have a play yourself, I would love to see what you makes :O)   I shall away now... I am knee deep in sample making for my tellybox shows on Tuesday next... brand new stamps and stencils and I am getting a smidge excited using them!!!    Thanks for looking, have a fabby day!  TTFN

Hels x

Sunday 25 May 2014

Sunday Stamper - Week 309 - Wind of Change

Goooodly Morning Stampers and a very happy Sunday to you all!  Big thanks for all the lovely entries to last week's challenge... it is so good to see new peeps joining in too!  This week the theme is a little different to "normal".  Oh yesh, I am mixing it up a little!  This week (as the song title would suggest) I would like you to CHANGE SOMETHING.  So, be it an alterable (as I have done) a stamped image, embellishments, papers, cardstock... anything you fancy changing!  The rules are simples: make a little something - it can be anything that gets  your Mojo going!  Add in the theme AND some stamping (that is the important bit... stamping!) and then pop back here, leave me a comment with a linky to the place you are showing your entry and I can hop over and visit you.  If you haven't got a blog/web-photo-hosty site, worry not, you can also join in via Facebook (tag my name) or by sending me a small res. pic of your creation. (my email addy can be found by clicking on my pic over there *points left*)  The challenge will remain open until 21:00 Saturday 31st May 2014.


My entry this week is also my latest DT piece for Jones of Nottingham... I was over the moon when I was given this fabby Kaisercraft MDF Baroque Frame.  Isn't it a beaut!!!   It is big as well, about 15" tall so a lovely big project to play with.  I started out by changing the base MDF - using Kaisercraft Black paint, I used Cut & Dry to apply it to the surface and then a little paint brush to get into the nooks and crannies of the braoque design.  Once dried, I used a sanding block and took off some of the paint, paying attention to the open edges of the frame, so the original wood was showing through again.  I then used Vintage Photo Distress Ink to blend over the woody bits and colour them.  I love this effect, it makes the frame look really old and worn looking.  I toyed with the idea of adding Treasure Gold but decided to keep it shabbier looking.


The papers I used for the insert of the frame are the new Marion Smith Motley Papers.  These are adorable, lots of beautiful floral images and collage style papers - yum!   I am a bit bugged by that sentiment tho!  The stamping is cool, I love the sentiment muchly - from a Kaisercraft stamp - but hey, why is it wonky on the frame?  I dunno, I was careful when I stuck it down but it is still all a-wonk.  And, being as I am a stick-it-down-properly-first-time kinda gal, I used extra glue on the foam pads I used to raise the sentiment up... so it is stuck fast and I fear if I try to take it off, it will tear the papers underneath.  Humph!  Wonky words it is then!  I am embracing my mistakes lol    At the side of the word strip, I cut out little bits and bobs from the papers and layered them up - check out the ickle brolly!  That was part of one of the papers and works perfectly with the sentiment :O))


The flowers started life as plain white Coconut Kaisercraft blooms.  Now, the fab thing about using white flowers is that you can make them into any custom colour you likey!  I used a watered down Raspberry Cosmic Shimmer mist (it was too pink as it was) and then smudged Victorian Velvet Distress Ink over the edges of the petals to give them a bit of definition.  Also in my DT kit were some Kaiser embellies.. the little padlock, how cute is that!!! I couldn't not use it!  The pearls, sparklers and gem sprays are all Kaisercraft... and the little metal flowers are actually buttons from Jones.. seriously cute, I need more of those for my collection!  I jazzed up the floral embellies with some leaves that I cut using Tim's Movers & Shapers Tattered Leaves cut from green papers and scrunched up to make them a bit shabbier.    All in all, apart from the wonky wordage, I am pretty chuffed with how the frame turned out - I love that about altering stuff, take something brand new and plain and slap a bit of paint and ink on it and voila, it looks as if it has been around for a yonk and a half!


That is all for today... in time honoured tradition, it is actually Friday morning at the moment and I am relying on Mr Blogger to publish this post on time.  I am actually in Telford, teaching at Crafty Bunch, this weekend... I know I will be having a ball because I always do when I go there... Sue (she who makes THE best salmon sammiches in the world) always looks after me and she and the ladies who come to play always make me feel so welcome... and our Pauline is going to be there today and she is as mad as a barrell of monkeys so I know we will be laughing very lots!   As ever, have a grand day!  Thanks for looking and... TTFN!

Hels x


Saturday 24 May 2014

Curiously Rosey...

Gooooodly Morning to all you Compendium-ers!  Today sees the start of a brand new Compendium of Curiosities 3 Challenge.  To see all the details on how to join in with the challenge, CLICK HERE.  Also, if you pop across to Linda's blog, you will see all gorgeous creations that my talented teamies on the Curiosity Crew have made... well worth taking a cuppa and a Hobnob with you :O)    The challenge is sponsored by the Inspiration Emporium this time... so you will have a chance of winning a generous Gift Certificate to spend there.  As before, Tim & Mario have very kindly donated goodies for an extra prize... which will be awarded to the "Curiosity Crew's Choice"... so you have two chances of winning fabby prizes!  If you haven't got your Compendium book just yet, you can order a signed copy directly from the man himself... HERE.  And... Linda has also done a FAQ page for you.. HERE it is... all the info you will need is listed there.   This week we are turning to Page 65 of the book and making Tea Roses!  Now, as ever with the Compendium Challenge neither I nor the Curiosity Crew will be posting the technique instructions and participants must not do so either. We all want to encourage people to buy Tim's awesome book; giving away the instructions wouldn’t be fair to him. Linda will have no choice but to un-link any entries that don’t follow this rule.  


My entry this time is a tag... can you see a theme developing here?  Oh yesh indeedily, each week I will be making a tag (unless it is a type specific item like a Folio thingywotsit or something like that).  For the previous two challenges I have made tags each time and I want to continue to do this for Challenge #3.   Plus, I do love a good tag so it pleases me to work out the techniques on a tag base.   I am using Size 8 tags and I reallllly wish I had started using Size 10 because size 8 is ok but not big enough for all the stuff I want to load onto it!  At least it will curb my enthusiasm for overloading the embellies!  I began by sticking a piece of Tim's Menagerie 8 x 8 papers to the tag and inking the edges with Frayed Burlap and Walnut Stain Distress Ink.  A quick stamp over the papers with Frayed Burlap and my fave Tim Script stamp and my fave Tim diamond stamp added in Jet Black Archival.  This is another image that I am wanting to add through every thing I make for the challenges.. gives a bit of cohesion too :O)
 

As I wanted to make the background really old and shabby looking, I used a Frayed Burlap Distress Marker and the Distress Spritzer to waft some spritzy splots over the tag - love those little speckles!   The centre piece is a Found Relatives card that I cut down to fit into the Industrious Sticker frame (which was altered with Brushed Corduroy and Tarnished Brass Distress Paints) I coloured her a little with Distress Markers just to make her corsage pop from the old photo.  I layered a couple of Tim's Ephemera pieces under the centre piece (adding Remnant Rubs to the shield shape) and then I set about the roses.  Oh how I LOVE these pretty little blooms... and they are easy to make too :O)  I used Distress Core-dinations cardstock, sanding the leaves and flowers and then using Distress Inks to grunge them up a little once they were assembled.


Now, here's a little secret: I have been really struggling to come up with a tag design for this weeks' challenge... Mr Mojo has made himself scarce (plus all that time in the greenhouse has addled me brains) Anyways, I went to bed on Thursday night in a panic, I had to get my tag made and over to Linda before I went to bed and my productivity was zero.  Then, in the middle of the night I woke up!  Actually, I made myself wake up because I was actually having a lovely dream... in the dream I was sitting faffing about with all things Distress and was actually making this very tag!  How bizarre!  So, I leapt out of my cosy bed (ok, I kind of groaned and hobbled out of it) and grabbed a piece of paper and a pencil and sketched out the tag before I went back to sleep and forgot it!   The addition of the metal embellies that have been painted with Distress Paints in Festive Berries and Forest Moss are purely dream based!  I love my dreams!


I shall away now, I have kept you long enough with all my wafflings!  Thanks for looking, don't forget to pop around to leave a comment on all the Crew's blogs to be in with a chance of winning the extra bonus prize... and you have two weeks to play along too.  Have a great day getting inky!  TTFN

Hels x


Friday 23 May 2014

Easily Distracted...

...cor blimey and thrice alive!!!  It has been one of those weeks... you know, when you start the week full of goodly intentions to "do stuff" and end spending most of it doing "something else instead".  Well, my "something else" has been distracting me good and proper all week!  Oh yesh, the Greenhouse-That-Grim-Built has kept me occupied all week so all promises of sharing some of the stuff from the Jones' Retailer Day last Sunday has kind of been overlooked.  I meant to type up a blog post the other day but this week has fair whizzed past though.  You see, Grim has been on night shift all week and being as I am of a clumsy persuasion, I find it really hard to be as quiet as a mouse whilst he is in the Land of Nod during the day.  And why, when you are trying to be mouse-like, does everything end up being realllly noisy??  Anyways, taking the opportunity of the good weather and the fact that I have several hundred weight of cucumber, tomato, gourd and sunflower plants to pot on, I have been hiding out in the Greehouse-That-Grim-Built all week!


When I say several hundred weight, I am not joking!  I have never grown things from seed properly before - well, apart from a seed tray on a window sill which isn't the same thing - so this year, armed with packets of seeds and a new greenhouse, I got all down and dirty and planted all the seeds in all the packets... plus a load of seeds I had collected from Calendula and Morning Glory plants last year.  Little did I realise how easy cucumbers, gourds and tomatoes are to germinate.  At one count, I had over 40 cucumbers, 33 tomatoes and 43 gourds (not sure how that happened as I only sowed 37 gourd seeds!)  And of course, once these little beauties start to grow, they need potting on (get me, proper terminology and everything!)  Not to mention the Phlox, Sweet William, sunflowers (lots of sunflowers) and Sweet Peas.  The Sweet Peas kind of caught me out too... mainly because I didn't read the packet... after a month, not a single smidge of green was showing in the tray of Sweet Peas, so I got a bit grumpy, went and bought a different flavour of seed and sowed those too.  Impatience is not a virtue... Two months later I have 30 odd plants as they all decided to show their faces (not that I am complaining) so the one big tub of Sweets Peas in now three big tubs!


Anyways, the point of this waffle is my excuse for being a baaad blogger!  It would be just plain rude of me to ignore all those little plants - by the way, I have done a "clinical trial"  I decided that this "talking to plants" thing might be worth a punt.  So, I have little chats with them as they are growing... except for one pot of chilli seeds that I decided to ignore.  Well, sure enough, all the seeds germinated except for the single pot of chilli's.   There it sat, a pot of compost looking a bit forlorn... until a week ago when I said "if you don't start to show your faces soon, you are for the compost bin"  Sure enough, a couple of days later little green shoots have appeared!  So, it is true!  Chat to your plants and they will grow!  Simples!  Oh and I almost forgot... we have already had our first harvest too!  Oh yesh, I grew some radishes, just to see how easy they were... and nom nom nom!  They have grown perfectly and already been scoffed!  I have a massive tub of different flavour radish on the go now and another I am planting at the start of next week so that should see us through to July at least.  I am loving this gardening lark!  I hasten to add that I have found homes for a lot of the cucumbers/toms/gourd plants... there is only so much salad I am prepared to eat lol


This post is peppered with pics of the two tags I taught on the Jones Retailer day last Sunday - the blue tag, which is a Graphic 45 tag base, is from the morning class and is using the gorgeous new Kaisercraft Storyteller range of papers and two fabby stamp/stencil sets from Hampton Art... and the red tag is the afternoon class, that one is using the Be-YOU-tiful collection from Kaisercraft.


The card is using the Be-YOU-tiful collection too; the butterfly is a Kaisercraft stamp, the sentiment is also from Kaisercraft and the flowers... yep, Kaisercraft - these are Fire Fly colour - aren't they lushness!!!   I shall away now, I have bent your ear long enough with my tales from the greenhouse!  Have a great day... don't forget to check back tomorrow for the brand new CC3 challenge too.   Thanks for looking... TTFN

Hels x

Sunday 18 May 2014

Sunday Stamper - Week 308 - Don't It Make My Brown Eyes Blue

Goooodly Morning Stampers and a very happy Sunday to you all!  Many thanks for all your beautiful pink entries to last weeks challenge.   This week the theme is a nice simple colour one.... Use Brown & Blue.    To join in with the challenge is simples: make a little something, it can be anything you fancy.   Include the theme and add in some stamping and then pop back here to leave me a comment with a link to the place you are showing your entry and I can come visiting.  If you haven't got a blog/photo-hosty-thingy, you can also join in via Facebook (just tag my name) or by sending me a small res. pic via email.  The challenge will remain open until 21:00 Saturday 26th May 2014.


 My entry this week is actually a DT piece I made for Jones of Nottingham.  Today I am teaching at their retailer event - how exciting!!! Showing the shop owners all the gorgeous goodies available from Jones - I will be focussing on Kaisercraft and I will show you the project they will be making today a little bit later in the week.  Anyways, this shadow box is from Candy Box Crafts - it is really easy to put together, I used Cosmic Glue to stick the base together and then gave it a slap of black paint.  I cut a piece of the gorgeous Marion Smith Nirvana papers to fit inside the shadow box and then I covered the frame with more papers that matched perfectly. 


The insert paper has been inked with Tumbled Glass and Vintage Photo DI and then I did a bit of stamping with Kaisercraft stamps - the diamonds and bubble wrap and done with the same DI's and the dressform and butterflies with Watering Can Archival.  The sentiment is stamped in Jet Black Archival and popped onto some black card to make it pop.  I also stamped some butterflies and cut them out, adding them to the insert with a smidge of glue and a jewel for the body (from the delightful little Junque and Jewels embellies from Marion Smith)   As I seemed to be on a sewing theme, I covered a bit of Grungeboard with Claudine's  stickyback canvas and die cut the dressform (Tim's Sewing Room Alteration die) colouring lightly with Frayed Burlap DI and then scruffing the edges of the canvas and going around the edges with Walnut Stain DI.


And now for the embellies!  I had some cotton reels kicking about so I inked with Walnut Stain to age them and added string around and popped some little pins into them... the flowers are Kaisercraft blooms (more gorgeousness) and the rest of the embellies are from Marion Smith Junque & Jewels sets... check out that ickle push bike!  Nowt to do with sewing but it is so cute, I couldn't resist!


That is all from me for today... again, I am scheduling this post as it is really Friday night and I am just getting ready for my bed... up early in the morning (that is now yesterday) to travel to Hessle for my class at Craftique... and by now it is Sunday so I will be heading off to Nottingham.. I don't half get about!!!   Hope you have a great day, enjoy the sunshine!  TTFN

Hels x

Sunday 11 May 2014

Sunday Stamper - Week 307 - Lily The Pink

Goooodly Morning Stampers and a very happy Sunday to you all!  Many thanks for all your gorgeous entries to last weeks challenge.   This week the theme is a nice easy-peasy one.... use PINK.    To join in with the challenge is simples: make a little something, it can be anything you fancy.   Include the theme and add in some stamping and then pop back here to leave me a comment with a link to the place you are showing your entry and I can come visiting.  If you haven't got a blog/photo-hosty-thingy, you can also join in via Facebook (just tag my name) or by sending me a small res. pic via email.  The challenge will remain open until 21:00 Saturday 17th May 2014.


My entry this week is a tag that I have been faffing around with all week - you know, you start something and then you get distracted... and when you come back to it you have forgotten what you were doing?  Oh, just me then lol   Anyways, this one has been on the simmer all week and finally I have finished it!   The tag is a Size 8 and I covered it with some of Tim't 8" Menagerie papers (oooh, these are lush!) and then I did a smidge of inking using Pumice Stone DI and then overstamping with more Pumice Stone and a script stamp (although you can't actually see that now, it is there... honest!)   I then used Seedless Preserves around the edges  of the tag and lightly misted it with water to make the inking more subtle... and I love the pinky hue it gives off.  A final blend of Black Soot DI around the edges to give it a nice frame and then a little darker stamping using the diddy diamond stamp and Jet Black Archival ink.


The butterfly is the very first stamp I ever bought!  Wow, that has to be about 9 years ago now!  Anyways, it is by PSX who are no longer pressing rubber so I guess it is a bit of a rare one.  Well, he is one of my fave butterflies ever and I haven't inked him for yonks, so he was stamped onto more of Tim's papers, coloured with Black Soot and Seedless Preserves DI's and a waterbrush and then I misted over with a watered down mix of Raspberry Cosmic Shimmer Mist.   The flowers are just plain white ones... these were treated to a spritz of Black Dylusions spray and then more of the watered down Raspberry spray... just a smidge of pink showing on the petals.   Now, whilst I was misting with the Black Dylusions I had a bit of an oopsiedaisy!  Namely I spritzed the mister over the tag by accident.. pants!  Aha, not going to waste all that time and paper so I just went with it and I have to say, I rather like it!    The little frame is one of Tim's peel off's (too funny, peel off's!!!) and I have used some of his rub-on's underneath for the butterfly to sit on.  The letters are Alphaparts and I added a few blingy buttons and a bit of tulle to the top of the tag and there you have it!


I really should get myself moving... I am scheduling this post - tis Saturday night and I am just gearing up to watch the Eurovision... oh how I loves this annual fest of incredibly outrageous European musical bods.   So, I shall say... thanks for looking.. have a fabby day today!  I am away to Coventry again today for another Melt Art class as Daisy's Jewels & Crafts, we had a great day yesterday (uh-oh, I am thinking "it is still today... but actually it is yesterday now... "  EEEK!!!!)   Blimey, I better go before I convince myself that it is next week already!  TTFN


Hels x

Saturday 10 May 2014

Curiously Glittered...

Gooooodly Morning to all you lovely readers!  Today sees the start of a brand new Compendium of Curiosities 3 Challenge.  To see all the details on how to join in with the challenge, CLICK HERE.  Also, if you pop across to Linda's blog, you will see all gorgeous creations that my talented teamies on the Curiosity Crew have made... well worth taking a cuppa and a Hobnob with you :O)    The challenge is sponsored by the Funkie Junkie Boutique this time... so you will have a chance of winning a $25 Gift Certificate to spend there.  As before, Tim & Mario have very kindly donated goodies for an extra prize... which will be awarded to the "Curiosity Crew's Choice"... so you have two chances of winning fabby prizes!  If you haven't got your Compendium book just yet, you can order a signed copy directly from the man himself... HERE.  And... Linda has also done a FAQ page for you.. HERE it is... all the info you will need is listed there.


This time we are turning to Page 56 of the book and playing with Distress Glitter.  Now, most of you will know that "I don't do glitter" is a very common utterance out of my mouth.  Oh no, I am not a glitterer kind of gal. However! There always be an exception to the rule and yes, it is in the form of Distress Glitter!  So, what is so special about it?  Well, first up, the colours match the palette of Distress (and seeing as I live my life in Distress colours, it is perfect for me)  AND... you can ink it!!!  Oh yesh indeedily!   Anyways, I won't spill the beans on how you use the Glitter... I will tell you about how I made my tag though :O)


I used a bit of Tim's 8 x 8 Menagerie paper collection, sticking it to a Size 8 tag and then blending Gathered Twigs around the edge to cover the white bits at the edges.  I made three mini Tattered Florals roses from Tim's papers and cut some Spring Greens using his Wallflower papers (LOVE these sooo muchly!)  The glittered bits are Grungeboard cut using Tim's Movers & Shapers Branch, Butterfly and Leaves.   The floral trim along the bottom was coloured with Tumbled Glass and Victorian Velvet DI's and then I added Rock Candy Distress Glitter to it to add a bit of bling before adding a few little taupe coloured pearls.


The rest of the Glitter colours used are: Tumbled Glass and Broken China on the butterflies, Peeled Paint and Shabby Shutters on the leaves and Vintage Photo & Tarnished Brass mixed together on the branch.  As the papers underneath are beautiful, I kept the stamping to a minimum and just added a few diamonds to the edges and added a Remnant Rub along the top.  The wordage is also made up from Remnant Rub's.  Finishing touches were the Linen Ribbon and some tulle that I coloured with a smidge of Gathered Twigs DI and a few bits of Idea-ology and some pearly dangly bits.


Don't forget you have two weeks to play along with the challenge so plenty of time to get nice and inky.  I shall away now... as ever, thanks for looking... have a great day! TTFN

Hels x

Sunday 4 May 2014

Sunday Stamper - Week 306 - Walk of Life

Goooodly Morning Stampers and a very happy Sunday to you all!  Many thanks for all your fabby entries to last weeks challenge.   This week the theme is.... LIFE.   It is entirely up to you how you chose to interpret the theme.. be it the word Life, something that is in your own life... tis up to you!  To join in with the challenge is simples: make a little something, it can be anything you fancy.   Add in some stamping and then pop back here to leave me a comment with a link to the place you are showing your entry and I can come visiting.  If you haven't got a blog/photo-hosty-thingy, you can also join in via Facebook (just tag my name) or by sending me a small res. pic via email.  The challenge will remain open until 21:00 Saturday 10th May 2014.


My entry this week is part of my workshop sample for today's Distress With A Bang class at Art from the Heart in Harrogate.  As it is a class sample, I won't go into detail on how I made it... oh and it is an exploding box... just in case you were wondering where the  "bang" bit came into the class title :O) 


I used lots of Tim goodies for my creation including Distress Ink, stencils, dies, papers, stamps... oohlallaaaaa... tis going to be a very goodly day indeedily!  And of course, whilst in Harrogate I shall be on a mission to find some proper northern fish n chips - well, it would be rude not to right?


At the moment it is Friday night and I am scheduling this post... so I guess I had better get a move on and get myself to bed - up early for the drive up north.   Thanks for looking, have a great day!  TTFN

Hels x


Friday 2 May 2014

Feathery Inky Splats...

...oohhooo, I have been a-playing again with my delish new stamps from Darkroom Door.  To see the new releases CLICK HERE... I warn you, they are all gorgeous... and I neeeeds them all!  Anyways, today I have been playing with the new Essentials Feathers stamp set... feathers? Oh lallaaaa... feathers!!!  There are five different designs and they are all fab.  I made a little greeting card with one of them...


Actually, I tell the truth, I was looking at the Feathers and was wondering what I could do with it... and then I remembered I have the Pen Nibs Eclectic stamp set... oh ho!  Pen nib, on a feather = quillHurrah!  And then I remembered I also have the Paint Splats Essentials set too.   *told you the other day I am dead lucky didn't I?*  The feather was stamped with Wendy's Archivals in Watering Can, Hydrangea and Cornflower.  The nib was inked in Versafine and then I used Ranger's Queen's Gold embossing powder to make it a bit metallic... then colouring the white bits with Vintage Photo DI so it toned in.  Now I needed something for the quill to be doing...


Spying the large Beauty Quote stamp I quickly nabbed it and inked with Jet Black Archival, stamping onto cream card and then adding some little splats from the Paint Splats set... then inking around the card using Antique Linen, Faded Jeans and Gathered Twigs DI's... popping the feather onto 3d foam was the finishing touch!


Don't forget you can see all the amazing creations my teamies have been making with the new stamps HERE... take a hob nob and a cuppa with you though, you might be some time!  And of course, you can view all Darkroom Door deliciousness HERE.   That's all from me for today... am off to get myself all packed up for me trip to Harrogate this weekend.  Thanks for looking... TTFN

Hels x

Related Posts with Thumbnails