
Evening friends,
I have piccies of my second board book and have got a few spare minutes to upload them!
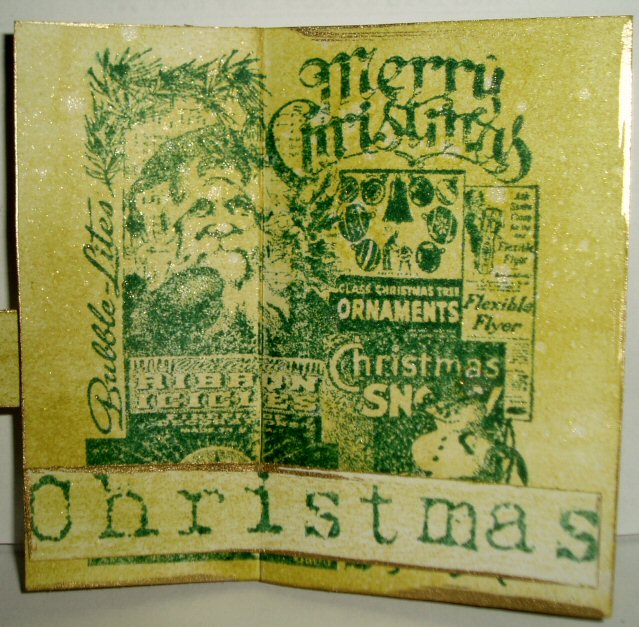
I used the same kind of technique as with the other one but this time I used Cool Peri and Silver Adirondack Dabbers. I used a brush to paint the pages, again, alternately swapping the lilac with the silver.
I used a range of stamps by Penny Black, Tim Holtz, PSX, Whispers and Rubber Stampede. I wanted to make this one a bit "girly" so went with butterflies, dragonflies and flowers for my theme.
I embellished this book with flowers and butterflies that I had layered onto the pages using silicone glue to add some depth to the project.
I think I like this one better than the other...it made a nice change to make something girly instead of "grungey" :O))
Thank you all for looking...and I wish you all a very Merry Christmas ...may it be full of joy and happiness and lots of chocolate too!
Hugs Hels xx
Monday 24 December 2007
I Got A Little Board...Again!!!
Sunday 23 December 2007
I Got A Little Board!!
Hi Peeps,
Blimey, where has this last week gone? I haven't been able to get into the Craftroom much this week, so made the most of a late night last night and got cracking on some Board Books that my dear MIL had managed to get for me from a Car Boot Sale. 
I have previously altered one book using papers and embellishments so wanted to do something a little different with this one. 
My friend Linda made me a book earlier this year and used acrylic paint to cover the pages, so I, being a total copycat :O)), borrowed the idea and altered my own.
I started by peeling all the pictures off...if you are careful, you can peel them off all together, but cos I am not careful, I managed to stab myself with a craft knife and took about 30 mins to get all the bits peeled off!! It was worth it though, as the board is rough without the pictures and gives a better key for the paint to be applied to.
I am really pleased with the results of this one. I used my favourite colour (of the moment) Adirondack Dabbers in Gold and Juniper. I used a small brush to paint the Dabber on to the page. I alternated the colours to add a little definition. Once the pages were dry, I then used the "Dabber" and streaked the opposite colour over each page to tie in the theme. I then used Tim Holtz stamps mounted and unmounted, using Sepia Versafine ink and clear embossing powder to set the images as the paint is not porous and the ink just sits on top of it.
I punched a hole in the front cover and attached an eyelet using my Crop-A-Dile and then threaded gold and brown ribbon thru it.
I am hoping to have the next one ready for Blogging tomorrow...Xmas food prep permitting!!
Thanks for looking - and a Very Merry Christmas to you all :O))
Hels x
Tuesday 18 December 2007
Happy Christmas!
Hello again,
I have been catching up with the dreaded cardmaking for the season. I really do struggle to make Christmas cards, I don't know why but I have this bad habit of leaving it right to the last minute. I guess I should be more organised and stop playing with my new Bind It All machine!!
Anyways, here are a few of the cards I have made for 2007. I have enjoyed making these as it is a departure from my usual sticker and peeloff cards. I only started stamping about a year ago so this is my first Christmas using stamps and inks.
Card 1 
For this one, I used alcohol inks on glossy papers. I started by squeezing a dab of Stream, Stonewashed and Denim inks onto the felt applicator. I then dragged the applicator across the length of the card to make a lined pattern. I re-inked the felt pad and dragged the applicator across the width of the card, so I now had a checkered pattern.
A few drops of silver mixative onto the felt pad and then dragged over the card gave me a lovely metallic sheen to the design. I then sprinkled some blending solution onto the card, like shaking a vinegar bottle, and then used my heatgun to dry the solution.
Next I inked up my jolly Santa stamp (Tim Holtz collection) using Imperial Purple Versafine. I then used the holly stamp (another of Tim's) and stamped this image onto all the corners. I then used a small piece of the patterned card to add my message (another of Tim's!!), matted both of the images to silver mirri card and then attached them to the card.
Finally, to tie in the whole theme, I re-inked the holly stamp (still Tim's) and stamped this in all the corners.
I love the combination of these colours, and also, thank you to Andrea for showing me how to do this technique with the inks! *sorry about the naff flashback on the photo, am rubbish at taking pics :O)) *
Card 2
For this card I used Cranberry, Red Pepper and Butterscotch alcohol inks and used the same technique as before. I used a gold mixative for the shimmer and then stamped, in Sepia Versafine, the other jolly Santa stamp (another of Tim's). I love this stamp too, he is a real cheeky chappie! I used a Hero Arts message stamp and matted both images onto gold mirri card. Again, I used the holly stamp on the corners of the card to tie in the design.
Card 3
For this design, I used the felt pad from the first card and added a little more ink and lots of Blending Solution as I wanted a paler version of the colours. I used a pearl mixative so it is more subtle than the silver. The stamp for the main image is a Ltd Edition collage from the Tim collection...can you see a theme developing here? LOL I used the Merry Christmas message stamp and then matted both onto silver mirri card. I used a "yew" sprig stamp for the corners to tie in the design.
This card was the one that OH chose to send to his Mum & Dad...which chuffed me as I liked this one most of all :O))
I have a few more piccies to upload later and I also have another 20 cards to make. I had better get off the computer and get into my craft room pronto!!
Thanks for looking...Hels x
Thursday 13 December 2007
And Finally......The other tags are here!!!
Hello again,
Blimey, I have been offline for ages!!!
Here are the remaining two tags that I made for the tag book I showed you before:
Tag 4 - Front
For this tag, I coloured the whole of it using Walnut Stain Distress ink and then spritzed with Perfect Pearls in water. I then stamped the "Tim" Santa. He is so cute tapping his nose, so I added the words "Wait and See" using red Junior Dymo tape. Then I took two numbers of Grungeboard and coloured them with Fired Brick Distress ink. To make then stand out I used a scrap of paper from the Cosmo Cricket "Be Good" range. I then smudged gold Dabber all around the edges to complete the whole look of the tag.
Tag 4 - Back
To get the aged look of this tag, I stamped and embossed in clear, a large distressed stamp. Once I had heat embossed the image, I then used Cut & Dry foam to spread Walnut Stain ink over the whole image. I then used a damp baby wipe to clean off the ink from the embossed area. I then used an offcut of mountboard and stamped the Merry Christmas message. This was attached to the tag using 3D foam and I added a little tree charm to it using a brad and some gold thread. The little flourish is Grungeboard that I coloured with my Gold Krylon.
Tag 5 - Front
For the main image part of this tag, I took some glossy card and used Alcohol inks to achieve the red and gold colours. The inks I used were Red Pepper, Cranberry and then a Gold Mixative. I stamped the image using a Sepia Versafine pad. The little Poinsettia were added just to finish the whole image. I coloured the whole of the tag with Fired Brick and Aged Mahogany Distress inks and then stamped the word "Believe" in Aged Mahogany. I used a gold Dabber to smudge the edges and also stamped the Poinsettia on the edges of the tag using the Gold Dabber.
Tag 5 - Back
As with the front of the tag, I used glossy card and alcohol inks to achieve the colours. Then, once I had stamped the image, I matted this onto gold Mirri card. I made the background a smudgey brown colour by using Walnut Stain ink and then stamped the mistletoe stamp onto the top of the tag. The little plate is Grungeboard that I coloured with Gold Krylon, stamped the word "Wish" onto a scrap piece of inky card and then attached using a couple of red brads.
I really enjoyed making this tag book. Here is a piccie of the finished article. You can see that I bound them using a book ring and added a few ribbons just to finish it all off.
Thanks for looking
hugs Hels x
Friday 7 December 2007
Christmas on a Tag.......or five!!
Hi there,
Following on from my enthusiasm for the tags that Tim Holtz is showing each day on his Blog, I have thoroughly been bitten by the bug and have made five tags this evening. I have made them double sided, so I have actually made 10 but they are together on a bookring and there are five in total.
I used several different techniques to achieve the results and I also "lifted" some of the ideas that Tim has been showcasing ... told you I am a copycat :O)) I started out with some plain cream cardstock and cut 10 tags shapes so they were ready to be altered.
Tag 1 Front
I used a messy method to get the background colour on this tag. First of all, I stamped the mistletoe stamp in clear ink up the side of the tag and then clear embossed it. This prepared the tag to have a "resist" pattern on it. I swiped Fired Brick and Aged Mahogany Distress inks onto a craft mat. I then spritzed the inks with Perfect Pearls mixed in water. This created a lovely inky mess which I then dipped the tag into. I let the inks soak into the tag a bit and then used my heat gun to dry the ink. I repeated the process so I had achieved a depth of colour. Once the inks were how I wanted them to be, I just wiped over the stamped image to make it clearer and then finished my main focal stamping. I also added a torn piece of paper and a chipboard letter to the tag for a bit of embellishment. The Junior Dymo came out of storage again to make the words on the tag.
Tag 1 - Back
I used the same method and colours for this tag. Instead of the mistletoe, I used a Merry Christmas stamp for the "resist" technique. The main image is from PaperArtsy...I love this Santa, he is so jolly :O))
Tag 2 - Front
For this tag, I painted the top half of it (roughly) with Frayed Burlap Cracklepaint. I painted it quite thinly as I wanted a more delicate look. Once the paint was dry, I used my finger to smudge Gold Dabber over the painted area, this just defined the crackles and blended them in a bit more. The backgound was achieved by swiping a Peeled Paint Distress pad over the tag and then spritzing with PP in water. I then used Pesto, Lettuce and Oregano Alcohol inks on glossy card, mixed with a little Gold Mixative. Once I had achieved the desired colour, I stamped the Collage using Sepia Versafine ink. Finally, I used a holly stamp with the Sepia pad onto the crackled area.
Tag 2 - Back
For this tag, I used a larger piece of glossy card that was coloured with the alcohol inks. I stamped the little girl image and then the yew branch on the corners to tie the design together. The background of the tag was achieved the same way as previously.
Tag 3 - Front
For this one, I painted Faded Jeans Crackle Paint on the top section of the tag. Once this was dry and crackled, I used my finger to smudge Pearl Dabber over it, this made it a bit paler and also added a shimmer. For the background on the rest of the tag, I used the same method as Tag 1 but used Faded Jeans and Broken China to get the right colour. I used my new Snowman stamp with Faded Jeans Distress ink on the lower half of the tag and embossed this with clear embossing powder. To cover the join between the paint and then ink, I tore a piece of paper and then inked the edges to blend it in. The snowflake brad and the Dymo word finish the tag.
Tag 3 - Back
I used the same technique as my earlier tag that I "copied" from Tims Blog. The only thing I haven't done is add the ribbon to the end of the tag...cos it is too fiddly!! :O)) I added a few snowflake brads and dotted Stickles onto them to make them all sparkly.
My Internet is on a go slow this evening and I have been booted off a couple of times, so I shall add the last two tags on tomorrow....thanks for looking...and hope you come back to see the rest!! :O))
Hels x
Wednesday 5 December 2007
An Inky Christmas Tag
Hi peeps
I have been avidly looking at the Blog of Tim Holtz (he who is Godlike!!) He is doing a "12 Tags of Christmas" theme at the moment and each day he is making a tag with a different techinique.
Some of the techniques he has done so far are beyond me as I don't have the stash to do it but this tag was perfect as I had most of the main components.
Here is my effort...I have taken two pics as I am rubbish at photography and couldn't get one pic to show the whole tag and all the bits on it!!

I had to improvise with the lovely beaded tape that Tim had used; so I used a wide piece of co-ordinating ribbon and threaded five silver bells onto thinner ribbon and then popped a silver brad inbetween each one so they don't fall off!! :O)) And I also improvised the snowflakes as I haven't got the Ghost ones...so I just alcohol inked some brads and a couple of Jolee's Boutique standouts.
The link to Tims website is at the bottom of this page...you can go directly there and then jump to his Blog...and see how it should be done!!
Thanks for looking
Hels x
Tuesday 4 December 2007
Looks Like Grunge to Me!! (Part 2)
Hello again
I am back with the other piccies of the projects I made yesterday using the Grungeboard.
This time, I have opted for a larger base to work on and the aim of the project was to create something that can be either hung up on a wall, propped up against something or even just laying flat. *there is method in my madness as these are all Xmas pressies!*
On The Wings of Love
I started making this project by cutting a piece of mountboard to a suitable size..it is about 5 1/2 inches square (ish) :O))
I used some paper from my stash and tore it so it covers one corner of the board. Before I stuck it down, I swiped a Fired Brick Distress inkpad over the part of the board that was not going to be covered with paper. I then spritzed with Perfect Pearls (Gold) mixed in water. This gave the inked part a nice distressed look. I then stuck the paper to the board and then edged the whole thing with a gold Krylon. I thought that this looked too clinical for the overall look, so I used my index finger and smudged gold Acrylic Dabber all around the edges of the board.
I next too the large heart from the Grungeboard Harlequin pack. I used Fired Brick again to colourise the heart and then spritzed with the PP's and dried quickly with a heat gun. Once the heart was dry, I used my index finger again and smudged more gold paint onto the heart. The paint only hits the raised bit of the heart, so this added to the distressed look. I then used fine grade sandpaper and sanded the heart a little bit too.
The wings are from the Plain pack. I painted these with Pearl Acrylic Dabber, using two coats to ensure a proper coverage. When the paint was dry, I used another piece of sandpaper and sanded the edges of the wings, then smudged the gold paint on randomly.
The crown is another piece from the Plain pack. I painted this all over with gold paint and then poked three holes into which I pushed three co-ordinating brads. I then used my fingers to curl the crown over so it became domed.
The flourish on this board has been distressed with Fired Brick and gold paint and then I cut a little piece off as it did not sit right on the design...and stuck the cut off bit onto the otherside of the flourish.
Finally, I used a Junior Dymo and made the words "on the wings of love" which I then sanded, distressed with Walnut Stain ink and then brushed over gold paint using my finger again. I stuck the words under the heart at angles so they looked a bit rough and ready.
Buried Treasure
Again, this is another piece of mountboard. This time I used coloured mountboard for the background and added a bit of Faded Jeans distress ink using cut and dry foam. I then spritzed it all with Antique Silver PP mixed in water. I used some Tim Holtz collection paper and tore bits off to make the design look random.
I then took a piece of Basic Grey paper (think it is the Lollipop Shoppe range) and scrunched it up. I then rubbed Antique linen Distress ink all over the paper so the ink stayed on the high bits. I spritzed again and this mad the ink smudgey. I used a Walnut Stain inkpad to stamp the map design and then risked the contents of my craft room cos i used a lighter to burn around the edges of this paper to make it look really old!
I used Weathered Wood Distress ink on the skulls and the arrows. I spritzed these with the PP too. I then added a couple of silver buttons to the larger skull; I had to use a silver krylon to change the colour of the buttons as I haven't got any silver ones big enough for the eyes!
I used a Junior Dymo for the words and distressed these as before.
I edged the whole board with silver Krylon and smudged silver acrylic paint around the edges to make it more grungey.
A Key To Your Heart
As before, I swiped the Fired Brick pad over the board where the paper wasn't going to be.
I used the same method with the wings and the heart, the crown and the key. I added three tiny buttons to the heart, painting them gold with the Krylon again.
The flourish is also painted gold and then sanded to give a shabby look.
I punched a hole in the top left hand corner and added a bit of golden ribbon and a little pebble charm that started life as a silver charm..yes, you guessed it, I coloured with my Gold Krylon again!
I know that these designs are lifted from the tags that Tim Holtz made but I just loved the designs and wanted to make something similar! That is a pathetic excuse I know...but...well...I cannot think of another!! :O))
Hope you like these little creations..I am more than pleased with the results.
I definitely need to buy more of the Grungeboard!!! Another addiction folks!
Thanks for looking
Hels xx
Looks Like Grunge to Me!!
Hi friends
I have been lucky to get some of the fab new product .... Grungeboard from the Tim Holtz range. I have fallen in love with it too!!
I was a bit nonplussed with it to start with..I was not sure exactly how to showcase it, so I clicked on Tim's website for inspiration. Not only has he got a fab video showing how to use it, he also has a few little projects on there showing how it has been used.
I decided to try and do a "lift" with a couple of the tags he has designed...I usually tend to steer clear of directly copying as I really don't like stealing someone elses idea...but for this particular product I thought I would break that rule!! And, I know that his tags are heaps better anyway!! :O))
Here are the two tags I have made..
Tag 1 - Love Is...
Firstly, I cut a piece of card into a tag shape. I then used some paper from the Tim Holtz range and also a bit from my stash. I used Walnut Stain Distress ink to edge the torn piece of paper to give it definition. I then used Fired Brick Distress ink to colour the heart. This heart is from the Harlequin design of Grungeboard. I spritzed it with Tattered Angels mist in Antique Gold and then dried using a heat gun. I then used some sandpaper and bashed the heart about a bit! The Grungeboard is really durable so can withstand quite a lot of bashing :O)) I took a pair of wings from the Plain pack and painted with Pearl Acrylic Dabber. I used two coats of paint to get a nice even coverage. I then painted a heart with Gold Dabber and used a flourish piece and coloured with the Fired Brick. Before I assembled the tag, I used sandpaper on all the other pieces to get that distressed look. I used a Junior Dymo to punch the words "Love IS..." and then sanded the plastic and used Gold Dabber on it to blend in more.
Finally, to bring the whole design together, I used my index finger to smudge Gold Dabber around the edges of the tag. A couple of ribbons in the top finish it nicely.
Tag 2 - Jolly Roger
Usually I hate anything that has a skull on it. However, I have now changed my mind!!! Loving this particular design and for this tag I used two of the skulls from the Harlequin pack and distressed using Weathered Wood ink. Again, I bashed the pieces about and sanded them and finally smudged silver Dabber over the top so they have a little sparkle. Again, I used Tim Holtz papers and the Junior Dymo, this time I used "Jolly Roger" as a title. I stapled the dymo strips to the tag for a little extra dimension. The arrows are Harlequin too, and again I have distressed in the same way.
I used silicone glue to stick the arrows to the tag, this way I could bend them and have them raised off the tag. I used a couple of buttons for the eyes of the larger skull. I didn't have the right size in actual silver, so I used a Silver Krylon and coloured them in before using silicone glue to stick them in.
Again, I smudged the edges using my finger and some Dabber paint...this just tied the whole design together.
I am really really chuffed with the results...so much so, I decided to "go large" and made three designs, very similar but used a large piece of mountboard as a backing. I will post about them a bit later!
Thanks for looking..and if you are toying with the idea of buying Grungeboard...don't delay...it is FAB and you NEED it!!!! NOW!!!!
Hugs Hels x
Sunday 2 December 2007
Christmas in an Envelope
Hi there
My latest project started life yesterday as a quick little book...and ended up taking me nearly all day!!! 
I recently bought some new stash and in the envelope was a free gift from the company (www.scrapz.co.uk)..the gift was 10 mini envelopes pre-cut and ready to fold and stick down.
I decided to make mini cards to go into five of the envelopes and then to bind them using the Bind It All. Well, the mini cards kind of got bigger and fatter and had more and more layers added to them!!
I had already decided to chose Christmas as the subject as I am steadily making little books for some friends for Christmas. For this particular book, I decided to use words from Christmas hymns or songs; starting with the envelope, I chose the title and then took it from there.
Envelope 1
Santa Claus...

As I had decided to use "Santa Claus" as the theme for this envelope, I chose Fired Brick and Aged Mahogany Distress Inks for my colour scheme. I started by taking some plain white card and cutting it to the right size to fit into the envelope. I coloured all of the card and then the envelope with the inks and then spritzed with Perfect Pearls "Sunflower" mixed with water. This gave the card a distressed look and also a little shimmer.
I used a selection of stamps by Tim Holtz, Crafty Individuals and PaperArtsy. The alphabet stamps that I used throughout the whole project are by StampsAway.
The rest of the words to the tune are stamped onto strips of card that I had also distressed and then there were stuck to the card using either Sticky Dots or 3D foam, depending on where in the card they were going. I had to be mindfull that I didn't make the card too fat, otherwise it would not have fitted into the envelope.
I used a paper distresser and roughed up all the edges and then went round the distressed bits with a Gold Krylon, just to finish the piece.
I embellished the card with AngelDust glitter (Art Institute) and added a little tinkly bell to the envelope.
Envelope 2
"Deck the Halls"


I chose to use brown tones for this envelope. I used Antique Linen, Faded Burlap and Walnut Stain Distress Inks and then spritzed with Perfect Pearls in water. I used "holly" stamps by Tim Holtz, RubberStamp Tapestry and Whispers. I made this card into a three fold and then added two more little pages to it. I used the same technique as previously and added the words to strips of distressed card using the Alphabet stamps.
To make sure that the pages I had added opened up properly, I used a scoring blade and made a little strip that I then glued to the rest of the card, this gave me a nice neat opening and also I was able to open the card out flat to add the words and stamping.
Finally, I distressed the edges and used Gold Krylon as before and added a little metal holly embellishment to the envelope.
Envelope 3
"Star Of Wonder"


I have just got some of the fab new Grungeboard (Tim Holtz Collection) and was itching to use it!! What better than to be able to find a fab excuse on one of the envelopes. I used words from a song, rather than the first few or the title.
I used Scattered Straw, Mustard Seed and Walnut Stain inks for this card. I added more little pages to it, again, using a scoring blade to make a narrow strip to fix all the pages together. Once I had coloured the card, I used the Perfect Pearls in water to get the shimmery look and then did my stamping using the Walnut Stain.
I took a few of the Grungeboard star shapes and painted them with Sunshine Yellow Acrylic Dabber. Once this was dry, I painted over with Pearl Dabber and then used my finger to wipe some of the Pearl paint off. Once the stars were dry, I then dabbed a bit of Gold Krylon onto my finger and smudged this over each star, giving it a little more lustre. I did the same with a little Grungeboard Crown shape too.
The stamps I used for this are from RubberStamp Tapestry...I have not got any other star stamps so have had to improvise a bit!
Again, the finishing touch is the Gold Krylon on the edges of the pages and envelope.
Envelope 4
"Oh Christmas Tree"


I used Weathered Wood, Broken China and Faded Jeans for this envelope and card. I decided to make the words stand out by using Sepia Brown ink and also stamped a couple of the tree images with this ink too.
I made some extra pages for the card, again sticking them with the scored strip.
The stamps are from Tim Holtz Collection, CherryPie Art (Dali tree) and RubberStamp Tapestry. I also added a little sentiment "Friends" to one of the pages as this book has been made especially for a friend.
Finally, I used a ZigZag glue pen to draw on thin lines of adhesive on the trees and then sprinkled Art Institute Angel Dust glitter over so the trees have a frosted look and I edged the pages with a Silver Krylon and added a little silver Christmas Tree charm to the envelope.
Envelope 5
"So here it is..."


Well, Christmas wouldn't be Christmas without Slade!!!
For my last envelope I wanted to be able to stamp various images rather than a theme so I chose to use Shabby Shutters, Peeled Paint and Pine Needles Distress Inks. I made the little card like a concertina and then added a page to the front and to the back.
I went a little bit mad with the stamping using stamps by Tim Holtz, PaperArtsy, Hampton Art and RubberStamp Tapestry.
Finally, I used the Gold Krylon again to egde all the pages and added a little bell charm to the envelope.
I made covers for the book using Mountboard which I distressed with Antique Linen and Walnut Stain and then stamped images from the Tim Holtz Collection. I have a cute little sleigh charm but it is silver, so I used good old Krylon to change the colour to gold and then attached it to the front cover with a jumpring. I edged the covers with Gold Krylon to tie in with the envelopes and cards and finally, spent ages tying little bits of ribbon to the binding wire!!
I had a lot of fun making this little book and I hope that the friend that receives it will love it too!
Thanks for looking
Hels x


