Hello again!
I have been crafting nearly all day today (blimey, it is almost tomorrow!!)
I have had this project in my mind for a few weeks now and decided to sketch out the design last night. As there is so much in the book, I wanted to be able to take my time with it and savour the crafting!! :O))
Whilst there are only five actual pages in the book, each one has different elements to it. The covers and pages are actually by Bind It All and I have been saving them for a special project. The quality of the pages was wonderful, they are really smooth and take the ink really well. The covers are also great, but a bit too shiney for my liking, so I had to put several coats of ink onto the surface to make the colour more prominant. I wanted to go all out with this book and make it special and also like none other that I have done before as I feel like I stuck in a bit of a crafting rut!
The front and back covers have just been inked and then stamped with Tim Holtz Collection stamps. I made a little aperture for the title and stamped "Friends" in to the middle of it.
Page 1
For this page, I took a 12 x 12 piece of cream card and cut it to the size of the main pages and added a few inches on to the measurement. I then scored a fold to be in line with the main pages, so I had made a flap of card. I cut the corners off the flap over bit, making it look like a tag. I then took one of the pages, scored down the left hand side about 1cm in from the edge, to make a neat fold. I took a spare piece of cream card and roughly tore down the right hand side and scored in from the left by 1cm again. I then stuck some DS tape to the scored piece of card and hey presto! I had made a little booklet.


I then used Antique Linen, Vintage Photo and Walnut Stain Distress pads and coloured all the pages and their backs. I then got to work with the stamping, using pieces of mountboard to add a bit of dimension to the stamping. I used a few DooDads to make a few words on the pages and finally, I added a lovely little jewel box clasp that I bought in the local hardware store. I attached the clasp with brads..but I had to chop of the legs off each brad as they were too thick to go through the tiny holes already in the clasp! I used some tape on the back of the pages to secure them properly and then added some card that I had decorated, over the top of the brad legs, so as to hide them.

I then stuck all the pages together and there was my first page, completed and exactly how I had planned it!!
Page 2
I designed page two with "secrets" in mind and wanted to make little secret folders and tags for it. So, I took two of the pages and coloured them with Milled Lavendar, Dusty Concord and Faded Jeans Distress Inks. I used a water spritzer to make a mottled effect on the pages and then I began my stamping. For the front of page two, I wanted to have a fairly simple stamping layout as I wanted to have a focal point in the centre. I made my own file folder, using a piece of scrap card, then colouring it to match the colours of the page. I stamped "Look" all over the front of it, adding a little magnifying glass to the folder and covering the "glass" of this with Glossy Accents so I got a shiny finish to it. Inside the folder, I used a Diamond stamp by Catslife Press and randomly stamped the image on the folder. I then used a Penny Black sentiment stamp to make my little message in the folder. I stuck some self adhesive velcro to the page and the folder to make a little fastening.

For the back of page two I randomly stamped my images, most of the stamping is using Tim Holtz collection stamps and I took a small piece of mountboard and coloured it, stamped a decriptive stamp on it and then adhered it to the page.
When I stuck the two pages together, I left one of the sides unstuck so I could slide a little tag into it ...another hidden element of the page. I took some cream card and cut out two tags shapes. I then decorated the tags with the inks and randomly stamped images onto them. I finished the tags with an eyelet and some gingham ribbons and then slid it into place inside the page.

Page 3
For this page, I used something completely different! I took an ordinary C6 cream envelope and stuck the flap down. I then coloured both sides of the envelope with Shabby Shutters and Peeled Paint Distress Inks. I then cut the top of the envelope open so I had an opening for more secret things :O))

I used a Penny Black Brushstrokes Iris stamp on the front of the envelope and then used a piece of mountboard which I had also coloured, stamped a Tim Holtz quote stamp onto it and then stuck this to the front of the envelope.
For the back of the envelope I wanted a bit of a grungy feel to it, as if the envelope had been sitting on my desk for years, so I stamped the new Tim Holtz stamps, the cup rings and the "Embrace Perfection" sentiment.
As I was inking the envelope, I had insdvertantly ripped a piece of the back of it off...whoops!! So I made a feature out of it and added the little sentiment stamp onto the torn bit!

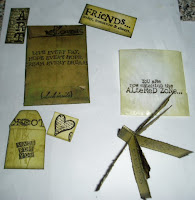
Inside the envelope are two more smaller envelopes. I had coloured and decorated both of these and wanted to hide a few things in them. In the largest of the two, I hid a teensy envelope I made, coloured and stamped and inside this envelope is a tiny piece of mountboard that I decorated and stamped on. Also in the bigger of the two envelopes are two more mountboard decorations that I made. In the glassine envelope is a little mini book that I made; I distressed a few tiny pieces of card, stamped on them and then stuck them all together to make a little book. I have taken a few photo's of the contents ...it would have been a mare to photograph them all, so I have done them as a collection! Much easier to display in here too!
Page 4
Page four is a bit more simple than the previous pages! I used Weathered Wood, Broken China and Faded Jeans Distress Inks to colour the pages. On the front of this page, I made a little lift up flap with a secret message underneath it. I stuck the card-flap to the page and added a couple of brads for decoration. I then stamped the front of the flap with Friends sentiment stamps and added my "Look" stamp to the bottom of the flap. Under it, I stamped my little bird stamp and added the Friendship along its wing. On the underside of the flap, I used a Tim Holtz sentiment stamp about friendship.....the theme for this page was Friendship ...but I know you will have guessed that by now!! LOL

On the back of the page, I made a mini card, coloured it and stamped on it and then added a little mountboard placque I made. I used the bird stamp on the back of the page aswell, as I wanted it to tie in with the overall theme.

Page 5
For my last page, I took two of the pages and instead of sticking them together all the way round, I scored into the top sheet and stuck this to the bottom sheet, so I had a little lift up flap. I then tore a piece of the front flap off to make the two pieces contrast. 
I used Old Paper, Fired Brick and Aged Mahogony Distress inks to colour the four sides. I then used Tim Holtz collection stamps on the first side, adding a little Wax Seal (7Gypsies) to the top of the stamped image of the Eiffel Tower.
Side two is all about Mona! I have the Tim Holtz Mona Collage stamp and I used this along with a little "postoid" Cherry Pie Art stamp of Mona...I added a little sticky paperclip to the postoid and Glossy Accents to the "Journey" stamp to give it a little more definition.
For side three, I kept the stamping simple. I have a lovely big Paris Map stamp (Tim Holtz..again) so once I had stamped this, I just added a few DooDads and the bottom corner, thelittle Catslife stamp of the car.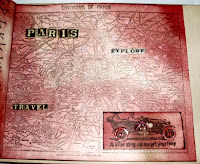
For the final side, I stamped the Tim Holtz Vintage Car and the sentiment. Then I tore a few pieces of Tim Holtz collection papers and stuck them to the page. Finally, I edged all the pages with black to give them a better finished look.
This book has been made especially for a dear friend but I have not written on the cover yet...so it remains a secret for a while! ;O))
Thanks for looking...and sorry it is such a long story...lots of different elements in the book though!!
Hels x
Saturday 27 October 2007
Friends.....A Book of Secrets
Posted by
Hels Sheridan
at
23:51
17
Inky Thinkings
![]()
Labels: Bind It All
It's For My Daddy.....
Hello again friends, 

It is my Dad's birthday next week and I decided to make a little Bind It All book for him. I used ATC sized pages as I wanted the whole book to have a "little" look about it.


I kept the colours simple using Walnut Stain Distress ink and a mixture of papers by DaisyD and NRN Designs.
I used a selection of stamps by Catslife Press, Penny Black, Crafty Individuals, Cherry Pie Art, PaperArtsy, Tim Holtz Collection and Stampington.


I made a book very similar to this one a few weeks ago, so I will keep the decriptions short!! :o))
I cut all the pieces of paper and card to the right size and then set to with the decorations. I inked all around the edges of the pages with the Walnut Stain, as this blended it all in nicely.
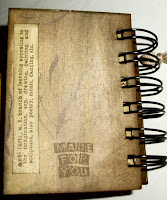
As this book is for Dad, I wanted to keep it quite masculine but still have some fancy stamping on it. I think I managed to achieve this and think Dad will be chuffed with this little keepsake.
Thanks for looking
Hels x
Posted by
Hels Sheridan
at
23:38
5
Inky Thinkings
![]()
Thursday 25 October 2007
Monochrome Bind It All

Hello Peeps,
I have been busy with my favourite stamps, papers and machine today! 


It is a friends birthday tomorrow and I was trying to get this book finished this morning, but what started out as a little project, grew and grew...so I am sorry to say, the book will be a day late getting to her...hope she forgives me!  #
#
For this book, I used Avenue by Crate Papers, the Brush Butterfly stamp by Penny Black and several phrase stamps by Tim Holtz, Penny Black and PSX.


For the cover, I used some of the diecut letters from the Avenue range to spell out her name. I placed some of the letters flat onto the cover and raised two up onto 3D foam to give the cover that added dimension.

I then cut several different shaped and sized pieces of cards and decorated them with the papers and rubberstamping.
I used black Distress Ink to smudge all around the edges of the pages to give them some uniformity and also, added the odd touch of silver Stickles here and there to jazz it all up.


As a finishing touch, I added some little silver embellies on jump rings and dotted them thru the book.

Once I had bound the pages, I tied co-ordinating ribbons to the wire and then added a little white tassle I made.

I hope she likes the book, the papers are so versatile and look great on any project.
I made a card and an ATC to match the book so all the things she receives will be co-ordinated!

Thanks for looking....Hels x
Posted by
Hels Sheridan
at
21:37
17
Inky Thinkings
![]()
Labels: Bind It All

